修改方法:
1、打开 \phpcms\languages\zh-cn\admin.lang.php 文件(PHPCMS的中文语言定义文件)
找到 //site manage (约511行) 并在此代码下边添加新建字段的中文名称
$LANG['my_message'] = '站点信息';
$LANG['my_gsmc'] = '公司名称';
$LANG['my_dz'] = '地址';
$LANG['my_yb'] = '邮编';
$LANG['my_dh'] = '电话';
$LANG['my_rx'] = '热线';
$LANG['my_bq'] = '版权';
$LANG['my_ba'] = '备案';
2、打开 \phpcms\languages\en\admin.lang.php 文件(PHPCMS的英文语言定义文件)
找到 //site manage (约504行) 并在此代码下边添加新建字段的英文名称
$LANG['my_message'] = 'sitemessage';
$LANG['my_gsmc'] = 'Corporate Name';
$LANG['my_dz'] = 'Address';
$LANG['my_yb'] = 'Zip Code';
$LANG['my_dh'] = 'Tel';
$LANG['my_rx'] = 'Hotline';
$LANG['my_bq'] = 'Copyright';
$LANG['my_ba'] = 'Keep on record';
3、打开 \phpcms\modules\admin\templates\site_add.tpl.php 文件
搜索 seo_configuration (约46行) 在比代码下边找到 <div class="bk15"></div> (约62行)并在此代码下边添加以下代码:
<fieldset>
<legend><?php echo L('my_message')?></legend>
<table width="100%" class="table_form">
<tr>
<th width="80"><?php echo L('my_gsmc')?>:</th>
<td class="y-bg"><input type="text" class="input-text" name="my_gsmc" id="my_gsmc" size="30" /></td>
</tr>
<tr>
<th width="80"><?php echo L('my_dz')?>:</th>
<td class="y-bg"><input type="text" class="input-text" name="my_dz" id="my_dz" size="30" /></td>
</tr>
<tr>
<th width="80"><?php echo L('my_yb')?>:</th>
<td class="y-bg"><input type="text" class="input-text" name="my_yb" id="my_yb" size="30" /></td>
</tr>
<tr>
<th width="80"><?php echo L('my_dh')?>:</th>
<td class="y-bg"><input type="text" class="input-text" name="my_dh" id="my_dh" size="30" /></td>
</tr>
<tr>
<th width="80"><?php echo L('my_rx')?>:</th>
<td class="y-bg"><input type="text" class="input-text" name="my_rx" id="my_rx" size="30" /></td>
</tr>
<tr>
<th width="80"><?php echo L('my_bq')?>:</th>
<td class="y-bg"><input type="text" class="input-text" name="my_bq" id="my_bq" size="30" /></td>
</tr>
<tr>
<th width="80"><?php echo L('my_ba')?>:</th>
<td class="y-bg"><input type="text" class="input-text" name="my_ba" id="my_ba" size="30" /></td>
</tr>
</table>
</fieldset>
<div class="bk15"></div>
4、打开 \phpcms\modules\admin\templates\site_edit.tpl.php 文件
搜索 seo_configuration (约43行) 在比代码下边找到 <div class="bk15"></div> (约59行)并在此代码下边添加以下代码:
(注意:与第三步中的代码有略微的不同哦,下边的input中有value值):
<fieldset>
<legend><?php echo L('my_message')?></legend>
<table width="100%" class="table_form">
<tr>
<th width="80"><?php echo L('my_gsmc')?>:</th>
<td class="y-bg"><input type="text" class="input-text" name="my_gsmc" id="my_gsmc" size="30" value="<?php echo $data['my_gsmc']?>" /></td>
</tr>
<tr>
<th width="80"><?php echo L('my_dz')?>:</th>
<td class="y-bg"><input type="text" class="input-text" name="my_dz" id="my_dz" size="30" value="<?php echo $data['my_dz']?>" /></td>
</tr>
<tr>
<th width="80"><?php echo L('my_yb')?>:</th>
<td class="y-bg"><input type="text" class="input-text" name="my_yb" id="my_yb" size="30" value="<?php echo $data['my_yb']?>" /></td>
</tr>
<tr>
<th width="80"><?php echo L('my_dh')?>:</th>
<td class="y-bg"><input type="text" class="input-text" name="my_dh" id="my_dh" size="30" value="<?php echo $data['my_dh']?>" /></td>
</tr>
<tr>
<th width="80"><?php echo L('my_rx')?>:</th>
<td class="y-bg"><input type="text" class="input-text" name="my_rx" id="my_rx" size="30" value="<?php echo $data['my_rx']?>" /></td>
</tr>
<tr>
<th width="80"><?php echo L('my_bq')?>:</th>
<td class="y-bg"><input type="text" class="input-text" name="my_bq" id="my_bq" size="30" value="<?php echo $data['my_bq']?>" /></td>
</tr>
<tr>
<th width="80"><?php echo L('my_ba')?>:</th>
<td class="y-bg"><input type="text" class="input-text" name="my_ba" id="my_ba" size="30" value="<?php echo $data['my_ba']?>" /></td>
</tr>
</table>
</fieldset>
<div class="bk15"></div>
5、打开 \phpcms\modules\admin\site.php 文件(后台站点信息文件)
搜索 public function add() (约23行)
在此函数中找到
$default_style = isset($_POST['default_style']) && !empty($_POST['default_style']) ? $_POST['default_style'] : showmessage(L('please_choose_the_default_style'));
在此代码下边添加字段获取代码:
$my_gsmc = isset($_POST['my_gsmc']) && trim($_POST['my_gsmc']) ? trim($_POST['my_gsmc']) : '';
$my_dz = isset($_POST['my_dz']) && trim($_POST['my_dz']) ? trim($_POST['my_dz']) : '';
$my_yb = isset($_POST['my_yb']) && trim($_POST['my_yb']) ? trim($_POST['my_yb']) : '';
$my_dh = isset($_POST['my_dh']) && trim($_POST['my_dh']) ? trim($_POST['my_dh']) : '';
$my_rx = isset($_POST['my_rx']) && trim($_POST['my_rx']) ? trim($_POST['my_rx']) : '';
$my_bq = isset($_POST['my_bq']) && trim($_POST['my_bq']) ? trim($_POST['my_bq']) : '';
$my_ba = isset($_POST['my_ba']) && trim($_POST['my_ba']) ? trim($_POST['my_ba']) : '';
继续在此函数中找到
'default_style'=>$default_style
并在此代码后边添加
,'my_gsmc'=>$my_gsmc,'my_dz'=>$my_dz,'my_yb'=>$my_yb,'my_dh'=>$my_dh,'my_rx'=>$my_rx,'my_bq'=>$my_bq,'my_ba'=>$my_ba
同样在 public function edit() 函数里也添加上面的代码
6、修改数据库v9_site表添加字段(如下图)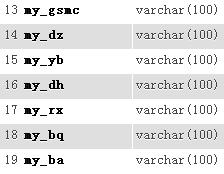
7、调用
在模板最开始加入<?php $SITES = getcache('sitelist','commons'); ?>
调用代码(公司名称、地址、邮编调用示例)
公司名称:{$SITES[$siteid][my_gsmc]}
地址:{$SITES[$siteid][my_dz]}
邮编:{$SITES[$siteid][my_yb]}
以上就是phpcms v9站点管理中添加自定义变量(备案、版权、手机等)的详细内容,更多请关注php知识-学习天地 www.lxywzjs.com其它相关文章!


